

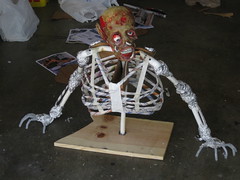
This is my first, and so far only moving prop, the Cauldron Creep. It is very simple as far as the construction goes, it's just the idea that's a bit different. You don't need to use a skeleton, you can make it be anything as long as you remember that what makes it look real is that one arm never moves, and the other arm is totally loose like a marionette.
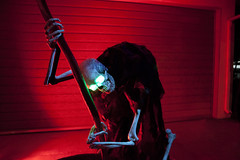
Check him out in action last year:
Watch this video closely and you should be able to figure out what's going on:
Parts List:
20 ft 1/2" PVC
8 1/2" PVC "T"s
4 1/2" PVC 90°
1 5rpm motor (for head action)
1 Monsterguts Wiper motor
2 ultrabright LEDs
Red and Black electrical wire small gauge
2 monsterguts eyball blanks
1 foam skull
1 large "bag of Bones" from biglots
Creepy Cloth
1 can Greatstuff
1 can Black spray paint
1" drywall screws
5' 2x4
plumbers tape
ATX power supply
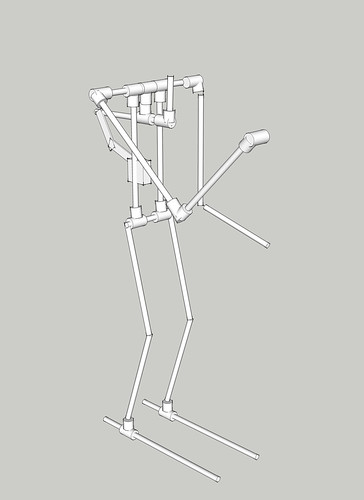
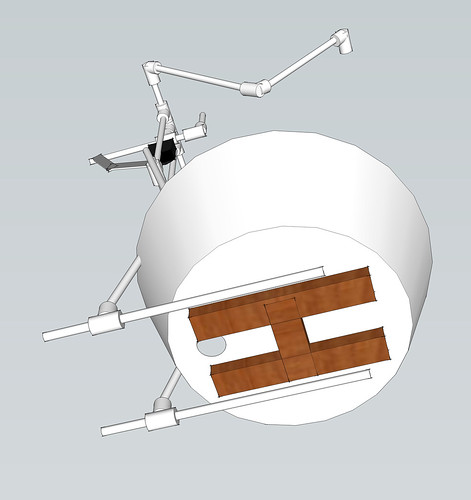
The Frame
I made a model of this in Google Sketchup 7. You can download it here if you want to look at it in 3-D. This illustration just shows the construction. It is not to scale, and the measurements used were just guessed, but i shows you what's going on inside.
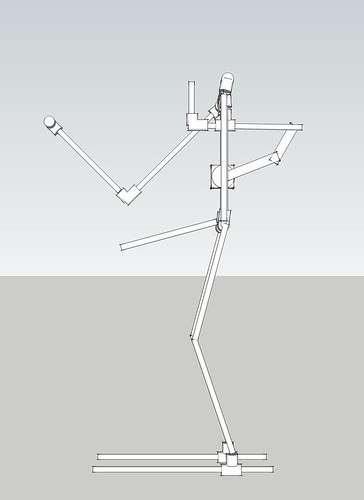

The frame is flimsy old 1/2" PVC pipe. I chose 1/2" PVC because (1.) I wanted it to be small since I was gluing bones to it, and I didn't want it to show up too much, and (2.) I thought it would have some give and kind of shake my skeleton a bit as the stick turned around. An added bonus is that it creaks, which lends itself to it being a creaky old skeleton.
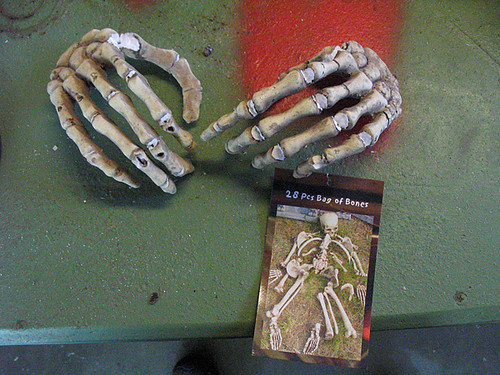
The Arms
I am using the "Bag of Bones" from Biglots, it has a lot of pieces and is affordable ($20). These are painted styrofoam with wire armatures inside of them. They look good and are very light, but be careful, they are easy to melt when using a glue gun. Set your glue gun to low to make sure you are gluing and not melting.
The Marionette Arm
The free moving arm, that is in the lower position, and is the bottom hand on the stick is a marionette arm. This means the joints are loose and flop around freely. You might think that you could just tie some string between the bones and be done, but this makes for a joint that is too free, and will flop wildly. You can see in the picture below I have two connections made from armature wire. This lets the arm bend in and out as the stick circles in the cauldron, but keeps the arms from flipping over. You'll have to practice making this joint a few times depending on what you use to make the arms.
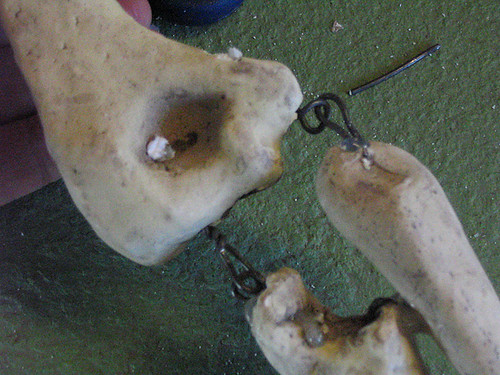
The hand joint is much simpler, as it has one looped connection the forearm.

The Rigid Arm
The rigid arm is very simple. Save for the wrist, the arm doesn't move at all. This arm supports the most of the weight of the stick, so make sure you set your PVC with screws so that it can't slide out of place. Where the hand connects to the wrist is just a simple connection like the hand for the marionette arm. To prevent mechanical binding, you might even use two loops of plastic coated wire.
The Hands
The hands bring this illusion together. To give them the solid look and to prevent shifting and/or binding, hotglue the hands in place to the stick. Tape the hand on the marionette arm in place first and let the stick turn for a few minutes, you want to make sure the arm doesn't get pulled straight all the way out, this seems to invite binding to occur. Lower or raise the lower hand on the marionette arm so that the overall position of the arm is mostly bent throughout the arc of travel.
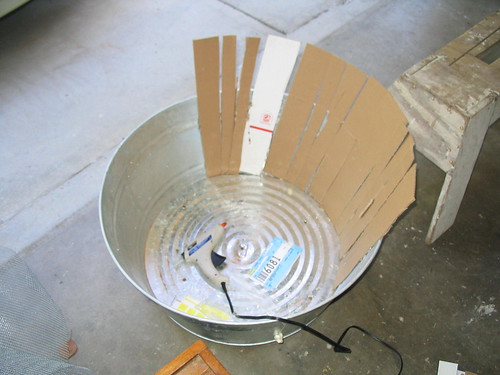
The Cauldron
Here is an overview of the cauldron. I started with a metal wash tub (like you fill with sodas and beer for your summer BBQs). I built up the sides with cardboard, which i then covered with muslin attached with spray adhesive and went over with latex paint and Greatstuff.
 Here is a sketchup rendering of what the cauldron looks like.
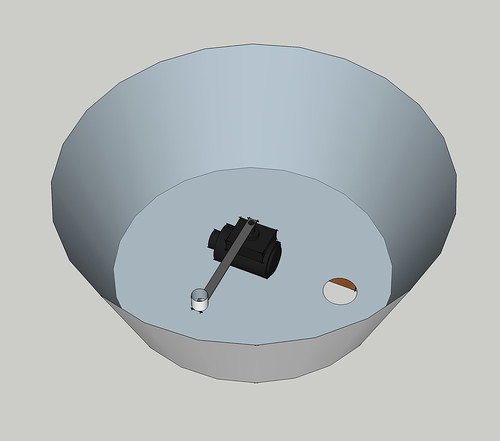 The rotating arm is 1/8" aluminum bar stock. I attached a 1" pvc end cap to the end with a 5/16 bolt and nut. I filled the end of the PVC end cap with hot glue until the bolt head of the 5/16 bolt was covered and the bottom of the cap was flat and smooth. The nut should be on the underside of the bar stock, and not inside the PVC end cap. If I hadn't done that, the end of the stick would catch the bolt head and bind as it turned. This way the tip of the stick rotates freely as needed.
View from the bottom:
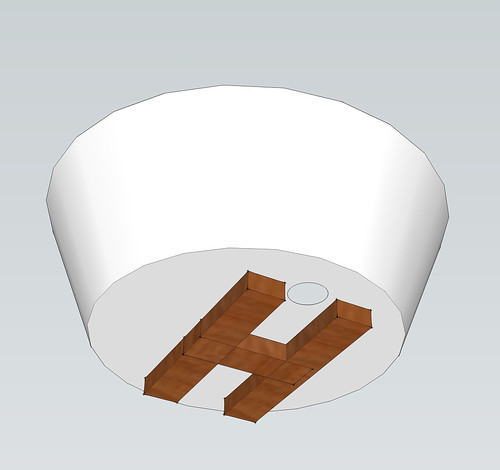 That "H" is where the steel tub is screwed onto the frame. The Monsterguts wiper motor is held down by copper plumbers tape, and then screwed down into the wood from above. The "feet" of the skeleton frame are also attached here. This gives the whole piece much needed structural integrity. If the skeleton was standing separate, the stick would push him away from the cauldron over time, and eventually knock him over.
See that hole in the bottom of the tub? Thats where a plastic "pool" or sump hose goes to pipe fog into the cauldron. I just use a fogger with a timer to puff fog into it, something like 5 seconds on at 15-20 second intervals.
Head Mechanism
The head mechanism in my creep is very sloppy, but easy to understand and implement properly when you build yours.
This is what mine looks like:
 It is driven by a 5 rpm motor from allelectronics.com. The motor is driven off of the 12v output from an ATX power supply. The leads are hard to get to. You have to open up the case of the motor to solder leads onto the hookups, or carefully cut away the plastic housing with a dremel.
The linkage is two parts. One is a piece of bar stock that is attached to the spindle on the motor. That attaches to another piece of bar stock in a joint connected with a 5/16 bolt, two washers, and a nut. Then the other end of the second piece of bar stock connects the PVC lever coming out of the back of the neck assembly. Here it is again connected with a 5/16 bolt, washers, and a nut.
Mounting the motor so that the linkage aligns with the neck is done by cutting two small pieces of PVC, about 1-2" to make spacers. Then these are placed between the motor and the right hand side "spinal column" and a 4" drywall screw goes thru each of the motor's mounting holes and into the column.
You can see the two pieces of bar stock are very long, but that's because I mounted the motor too far from the head. If you bring the two ends closer together (the motor closer to the head) the axis will shrink. If I hadn't been rushing to finish this guy last year I would have futzed around with it more, and still might change it this year.
The motor has a very weird and specific connection. Don't be frustrated, just grab a 5/16 or 1/4 bolt and either (1.) screw it into the plastic, making your own threads as you go with questionable results like I did. or (2.) use a thread and tap tool to cut the plastic out.
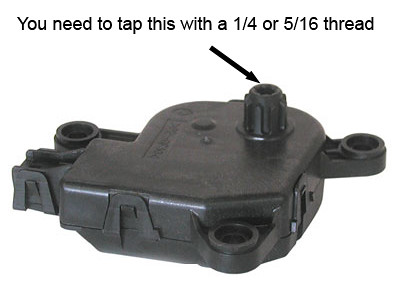
Here is example what it should look like when you get right. This should get you in the ballpark, and then you can adjust as needed:

I based this mechanism off of Woody Carr's oscillating witch neck.. It's kind of a sideways version.
Here is a great site explaining the how this and other useful mechanisms work. I recommend bookmarking it ASAP.
Finishing Touches
To wrap it up I'll got over a few items here I have been asked about.
The Eyes: I used two eyeball blanks from www.monsterguts.com. I placed them in front of the two ultra-bright LEDs I used for the eyes, I mounted them with hot glue. When you shine the LED thru the whole eye is gets very soft creepy glow. If you want more focused eyes, with a bright white pupil/iris, try drilling out a whole in the back of the eyeball blank.
Connecting the eyes: Check out this little info nugget from Scary Terry first. To power the eyes, you are going to run them off the 3.3v output from the ATX power supply. Because this output is so close to the amount of voltage needed to run the LEDs, you wont need a resistor, but because it is just enough voltage to run one LED, you need to wire these in parallel and not in series. Each LED gets its own connection to the power source. So run a red wire from the LED to one of the 3.3v outputs on the ATX. You can connect both LEDs to the output, but they each need their own connection to the output, this is called "parallel" wiring. For the ground wire, your gonna run a wire down to one of the outputs labeled common (aka ground). Just like the powered lead you did with the red wire, you;ll have to run two black wires to the common (ground).
The Skull: The skull I used is a urethane foam casting I made from a Bucky 1st quality skull. Lindberg skulls also look nice but consider the weight. Try using a foam skull if you can to keep it light. A Bucky or Lindberg skull might be too heavy, so be prepared to use a sturdier motor.
The Stick: I just used a stick I found in the woods. I say use a real stick because the one I used is pretty heavy and I think it has a big influence on how the movement turns out. Some other stirring witch tutorials have light weight foam sticks which might work or not.
The Bones: As I mentioned earlier I used the big "Bag of Bones" from BigLots that runs for about $20 dollars. After I assembled the creep and had him working, I spray painted the frame matte black. I used a glue gun set to low heat and glued the foam bones directly onto the frame. Where I didn't have things like ankle bones or knee caps, I made them out of little globs of great stuff and painted them to match.
The Ribcage: Mine is total crap. it's great stuff on hardware cloth. DON'T USE HARDWARE CLOTH! Its too rigid and cuts your hands up. I think a newspaper ribcage (like the picture below) should work out fine. All you need to watch out for is the mechanism catching in your ribcage.
Remember to use creepy cloth to cover up the shortcomings of your skeleton!
If you have any questions, just post them to this thread over on Hauntforum.
Resources:
Monsterguts.com
AllElectronics.com
Mechanisms
Woody Carr's Witch How-to
Scary Terrys Wiper Motor Page
Scary Terry's using and ATX power supply page
Google SketchUp
DC's 3-d file of the Cauldron Creep frame


What an amazing tutorial; thanks for sharing! Excellent diagrams! Stay True~
ReplyDeleteWOW amazing
ReplyDeletewhere can i get a copy of thee audio that i hear on the cauldron video - i hear a screach and some bubbles.
ReplyDeletethanks
your in luck, I just found it. I uploaded it to my website, you should be able to download it by right clicking and saving as...
ReplyDeletewww.hellizondohaunt.com/Files/Cauldron Final Sound.mp3
Thank you very much a wonderful how to. I wish I saw this two years ago when I lived in Northridge. Back then we used to create a haunted house at First Presbaterian school at Granada hills. I would have loved to help.
ReplyDeleteI picked up an ATX breakout board and connector from Sparkfun.com.
Where did you get the circular metal disk for head motor?
The disk is a plastic pipe/drain lid. that you can find in the plumbing area of your hardware store. it's about 5-6 inches across.
ReplyDeleteThank you very much for your instructions. I was able to build a variation based on help. Kids in our block love it; they helped with cauldron paint!
ReplyDeletehttp://www.youtube.com/watch?v=X8U9bs9EP9k
A question about the neck movement, I thought the PVC tees would fit rather snugly on the pipes - but in the video you can see the PVC tees that hold the head swivel back and forth - did you grind these wider or?
ReplyDeleteYes. I used a dremel with a drum sander to bore out the T connector.
DeleteReally amazing tutorial, thanks for sharing! very imressive and thank you very much for sharing this information.
ReplyDeletecode premium spotify gratuit
Awesome! Haunters helping fellow haunters! I LIKE IT! Thanks for the information!
ReplyDeleteHi my name is Jennifer how much would u charge to ship me one if your up for making another you did an amazing job my number is 754 234 9101
ReplyDelete