Wednesday, December 2, 2009

Wacky Zombie - Part 3. Paper Mache and Corpsing

I'm ALMOST done....just a spot here

FInally to the good part!!! Well almost. Painting is my favorite part, but paper mache means your almost done!

This corpse has a few special corpsing techniques, since it need to be grodey but still needs to be flexible, since this guy is meant to be posable. The and joints in his legs can be restricted or covered but still need to be sturdy. So lets get into it!

Mr. Chicken's Mache Technique

I heard from Mr. Chicken that he had built one of his ground breakers using paper towels and house paint. I had also heard someone mention in a thread or chat about using blue shop towels for mache. I need a very tough skin for this posable guy. So I have used the very tough and smooth blue shop towels and laytex exterior house paint. The paint I got from various sources; Biglots, "oops" paint form the hardware store, and salvaged from abadandoned properties. The glossier the better, as this makes it stickier and gives it a tougher finish.

Just a reminder this where we started:

He's got legs!!!!

I have just started the mache here. I am using full sheets at a time. I folder each piece into fourths, and then tear of the corners until they are round. This makes the seams disappear easier. Remember to wear gloves as this gets very messy. Then I dunk the paper into the bucket of paint and wring it out. I set it onto the frame very loose. THe looser it is the more wrinkles you can get. Once it is pushed down on the frame work, I push it around a bit, this brings out the wrinkles. The inverse of this is also true, the tighter you pull the mache across the frame work, the less winkles you get, and minimize the handling until it dries. By mixing these two techniques you can get a all kinds of dried out skin looks. Too many wrinkles and it will look like a sharpe'. Not enough and it will look like a porpise.

I used some great stuff to bulk out his pelvis here, in case you were wondering what that was.

Foamy groin

Mr.Chicken style mache over forearm

I seem to have lost my head

Flexible Corpsing

I developed this technique from the common "Latex and Cheesecloth" corpsing technique. I used soft t-shirt cotton rags I bought at the auto parts store and then soaked them in latex. Like the blue shop towels I folded them into fourths and cut off the edge to break up the hard lines. While still folded, I pinched little bits of cloth between my fingers and snipped them off. This is just like making a snowflake out of paper, only we want it to be irregular, so don't do this too much. Then I unfolded the rag and snipped out a few more holes, and poked in some holes with the scissors. I then soaked it in mold making (thick) latex. I smeared a little latex on the mache and then "glued" on the piece of cloth. You can see here how it covers the moving joint, and thanks to the holes, you can access the nut to re-position the leg.

Spawn of articulation joint

Daddy look, I'm a torso!

latex and t-shirt material

I also used the cheesecloth and latex technique to add some grosser corpsing.

Gauze, Latex, great stuff

Here you can see I have smeared Great Stuff randomly around the corpse to pull the whole thing together and add some detail. The bubbles it forms will help blend the cotton rags, the paper mache, and the cheesecloth.

I'm done

Once all the mache, latex, and great stuff have dried he got a coat of grey primer, which will blend all grays and the whites and yellow (latex) together, and give a strong even base for painting.

Wacky Zombie - Part 2. Fabricating a Body from Scratch

Like all creations they turn on their creators
(as someone pointed out, he's got em by the neck, and I have him by the balls.)

I built this corpse as part of a trade with the infamous Mr. Chicken in 2009. I made this body from scratch since I needed to fit some specs for the Chicken. It needed marionette arms and posable legs. I used arms like I had made for Cauldron Creep, and then I borrowed a great idea from Beelce, one the net's brilliant haunters. More about that in a bit.

The Armature
If you have been haunting or even interested in haunting your yard for a year or so, you probably have heard of or come across the zombietronix skeleton calculator. It is a great free tool and I use it all the time. It tells you what length to cut PVC to represent different bones, and tells you how much pipe and how many fittings you need to make your own pvc skeleton armature.

ZOMBIETRONIX

I started here with the general dimensions of the corpse, I put in a value for an average height of 5'9. I measured out the pieces of the 1/2" PVC and labeled each section so I would remember what they were once it was all cut up. I used a PVC cutter to make quick work of the pipe.

IMG_0309

I started forming the spine first. I set the spine segment with the pelvis and shoulders attached so I could grip it in the vise. I used a heatgun to slowly heat up the PVC in broad sections where I wanted the pipe to bend smoothly. You can tell if you overheating a small area as it will quickly discolor to a brownish green and start to bubble. Keep making long slow passes on each side of the pipe and push gently with your other hand, the pipe should start to give slowly. You want to heat it up just enough to bend. Overheating it means you have to wait longer for the pipe to cool and you'll have to stand there holding it in the shape you want even longer until it cools. I have found a way to "quench" the pipe. I used a small towel soaked with cold water and rub it along the pipe gently (so I don't deform the now soft pipe). This works very well and allows you to work more quickly.

IMG_0310

Then I assembled the rest of the pieces. Now stop here for a second and go read Beelce's Spawn of Articulation how-to. I forgot to shoot pics of how I made the legs, but I see no reason to show his how-to as my own. I made did it a bit differently than he did, I used the heatgun I had, and the vise to clamp down the ends. Seriously, go read Beelce's how-to and comeback!

The Ribcage

Sternum and support

I made a support arch to put the sternum on and hold the ribs in place. I am using newspaper ribs, and I don't want them to get crushed. The support is attached to the PVC with some hot glue, and the sternum piece (with teeth) is hot glued to the support arch. I used some duct tape here and there just for added strength.

sternum assembled

Look here and notice that I have taken the PVC of the shoulders and bend it with a heatgun. They looked too broad and unnatural. The measurements you get from the Zombietronix calculator represent the shoulders of the skeleton that include the collar bone, shoulder blade, and the top of the arm bone in an upright and correct posture. The shoulder piece should be cut shorter as it only needs to represent the shoulder blade and collar bone. I found in making 4 more corpses after this one that they should be quit short, to give the right look when making a corpse. The withering of the body collapses the stature of the skeleton, so the arms come in more at the shoulder.

attaching the ribs

You'll notice I cut teeth into the sternum piece so that newspaper ribs (just newspaper rolled up into a tube and the ends cut off) would slide over them. This step is not needed, just make sure you have the same number of ribs on each side. Another tip here is as you are going, make two of each of these cardboard parts like the sternum, the support, shoulder blades, etc. and save the other one as a pattern, since once you have a full sized corpse, you'll want another and another.

rib progress

Here you can see I have taped up the ribs as I go. I have hot glued them on and then added tape to hold them in place as the glue cools and to reinforce them. I will attach all of them to the sternum first before I start wrapping them around to the spine and attaching them.
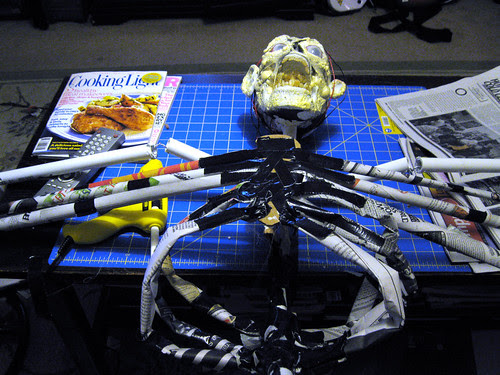
ribs half way

I have bent the ribs around to the back and hot glued them and duct taped them in place. I sized each rib as I went, just eyeballing the distance and shape. I have made two changes to how I do ribs since this projects. I now run a piece of bendable wire thru each rib so that it will hold it's shape. That makes this step easier, and removes the need for the support inside the sternum. I also have a chart I made from measuring a bucky's ribcage, and I drew a chart for which rib is which length. When I roll the newspaper I write the rib number on the rolled paper and cut it to length. Just a quick diversion to show how these better ribs go together.

IMG_0879

Roll some newspaper and cut it to length. You can see here the ribs in their component pieces, finished rib, tube of newspaper, and wire with hooked ends.

IMG_0880

Run the wire thru the tube of newspaper. Use some needle nose pliers to bend the end of the wire. This keeps the paper from sliding too much but mostly keeps sharp pointy wires from stabbing you or poking thru the rib later in construction.

IMG_0882

Bend the wire end again with e paper. This just helps to make the end of the rib studier. You don't want it to tear off after you have glued it.

IMG_0883

Then wrap the end in duct tape. This will make it much more durable during the hot gluing it to the sternum.

Repeat these steps on each end of the ribs.

rib cage

Once all the ribs are on, I added a collar bone of rolled up newspaper. You might think this is a "meta" detail, but it provides a support later for the paper mache so that the top of the chest cavity doesn't look like a big caved in hole.

shoulder blades

I made some shoulder blades out of cardboard and hot glue and duct taped them on. These fill out the back areas so there aren't any big empty holes back there either.

maquette arms

The Limbs


I started bulking out the PVC arms with some aluminum foil. This gives you a better looking arm, breaking up the shape of the pipe and allowing for more realism once covered in mache. The foil is just wrapped on, and any loose spots are touched up with a spot of hot glue.

He's got legs!!!!

I have bulked out his legs and added a cardboard pelvis.

hot glue hand w posable armature

I made some hands out of hot glue sticks and armature wire. I wanted them to be posable, and they were but I don't like this solution. They were hard to paint and hard to pose. I made a new hand design based on a an idea from BoneDancer.

IMG_0897

I cut out a palm from cardboard. I measured out some fingers from cheap ($.007 a foot) poly vinyl tubing using a jig I had made which was modeled off a real hand. I then ran some wire thru them. I bent the end around the tube at the fingertips and then I filled the end of the finger with hotglue to set it. I bent the other end of the wire into little semi-circles and hot glued those to the cardboard palm.

IMG_0898

I closed the hand with a matching piece of cardboard and hot glue the whole thing shut. Here you can see the jig.

IMG_0899

Then I used rolled up aluminum foil to bulk out the back of the hand. I have even made little tips for the fingers with little foil bits shaped into cones. That looks great when paper mached.

IMG_0900

Then to attach the hand I made a loop of wire with one end like a fork, and after covering the fork end with hot glue, I slid it into the little tubes of the corrugated cardboard.

IMG_0902

Then I bulked it up with aluminum foil to look like the wrist bones. The loop slides into the PVC arm and is secured with a squirt of GreatStuff expanding foam. For Mr. Chicken's corpse I just attached the hands to the arms with a small loop of string (marionette style, remember?)

Simple feet

The feet are made in a similar manner but are much more simple to construct.

Bulked up feet

...and this little piggy went to the graveyard...

After the Mache I sculpted toes with some epoxy clay.

In the next segment I'll cover the paper mache and corpsing techniques I used on this guy.

Friday, November 6, 2009

Carver Creep - 3 Axis Skull

Carver Creep

Say Hello to Carver Creep. An iteration of last year 's alliterated hero, Cauldron Creep. Yep, these guys work together. Hey, they are even related! Carver stacks em up, and the Cauldron boils em down.

Carver Creep is a an exercise in set building more than anything. He is essentially a Bucky skeleton with a GYS 3 axis Lindberg Skull kit. The mount I made so that the can be hunched over but not talk straight down into the table is the only trick thing going on here.

The Carver Creep set consist of a victim skull whose face has been removed and his tongue cut out and cut up like sashimi, a bowl full of shrunken heads, a stack of skulls under his table, an altar, and a drying rack for skinned faces. He also has a set of custom cutlery made from burning wood, flesh, and steel.

Now I'm not a technical guy in anyway, I can learn the stuff but I usually break it or ruin the first one of whatever my first attempt. At $200 bucks a kit, I decided to get some help. Through old fashioned bartering I entered into a trade with the tack smart and all around good guy Mr. Chicken. I made him a full on zombie to fit a sketch he had for a prop he wanted to build this year, and he assembled and programmed the skull to a soundtrack I made and a confusing tape of me trying to show him how the head should turn and look around as he talks. When I got the head back I installed the LED eyes and monsterguts.com eyeball blanks, closed up the head and filled the seam, except a screw driver sized hole in the back, so I can always pop him open if I need to.

I painted the whole thing with White Primer, then washed it down with Raw Umber and Matte Medium. Over that I used Wildfire White UV paint, which glows insanely bright, and is transparent under white light. I made some teeth from Fimo Translucent clay (the FIMO brand glows under black light).

Carver Creep Close-up
(look! its seamless, mmm so nice!)

The Victim Skull
I made this guy from one of the casts I made from my new mold I made from a modified Lindberg skull ( I drilled out the tooth pegs to look like real tooth sockets and added texture to the skull's forehead). The eyes are the Hong Kong eyes I got on Ebay with some Magic Sculpt Epoxy Clay for the muscles. The skin is Creative paperclay, since I find that easy to texture subtly. I made the ears out of Sculpey Firm. His teeth are the Sculpey Translucent, which is not UV reactive. His tongue and skinned face are also Sculpey.

Carver Creep's Victim

Tools of the Trade
I need to shoot these under a black light so you can see the burning ember effect, but this shot shows the metal nicely. These are tree roots I got at Castaic Lake. They are kinda like driftwood, but way more textured. I made the blades from sheet styrene which is the same plastic used on model kits (you can get it at a good hobby shop). I attached them with some plumber's epoxy then covered that with detailed muscle like tissues made from Magic Sculpt. The bone needle is all Magic Sculpt.

Tools of the Trade

Tiny Heads
I made these guys as an experiment with different combinations of Super Sculpy 3, Fimo, and Super Sculpey Firm. I tried to make different characters with each one. These are painted with eh Craft Smart brand of paints from Michael's.

Bowl of Shrunken Heads
Skull Pile
These are some full and half skulls casting I made form the same mold of the modified Lindberg skull. I made Fimo teeth and painted them with Wildfire white. These are cast in SmoothOn's Foam-It 5 which makes a very durable foam skull that can be handled roughly and dropped with little or no damage.

Carver's Pile of Skulls

The Altar
The altar is built around a giant root I brought back from the lake. I covered it with resin fetal skulls I made from a mold in this how-to. I surrounded the Altar with candle made from PVC, Hot glue, and flicker candles from the how-to in the Mitchell's How to Haunt your House Book. (Thanks to everyone in the crew who pitched in and helped make these candle. I think everyone did at least one). I then put in some of th e cool things i have collected over the years. A monkey skull, some hark jaws, a few jawbones, a Samoan tiki, and old metal dish filled with amber stones, and some shrunken heads from the previous years, which as I look at the pictures didn't have any black light paint on them.

Altar

The Drying Rack
I made this as kinda of a death mobile. A drying rack for skins and herbs. The two faces are Sculpey I laid over a cardboard skull masks from Michael's. The backs are covered in GreatStuff and painted like dried blood. I hung little bundles of plants that looked like herbs from the bottom rack. I had wanted to make ears for this to on the middle rack, but I just ran out of time. I'll finish it though, just for finishings sake.

Skinned Face Mobile with Headshrinking Herbs

The Routine
Here is the routine. For some reason my voice is coming thru the mix more on Youtube, but you'll get the gist. The camera is off axis from the dead zero of the skull, but its the only video that came out in focus on my new camera (need to read that manual.

Wednesday, October 28, 2009

Sneak Preview #4

Tools of the Trade.
Tools of the Trade
Sheet Styrene, wood, apoxie sculpt

Thursday, October 22, 2009

Sneak Preview #3

Finished this guy up last night. yum yum!

Wednesday, October 21, 2009

Tuesday, October 20, 2009

Tuesday, October 13, 2009

The Faceless - Habitat for Humanity Haunt

Jokers Head sepia

The fourth prop project this year that is NOT FOR MY haunt, and which annoys the hell out of my significant other is this guy. The Faceless was made for HauntForum's Joker, Shane Pitts who is doing a charity haunt in Texas for Habitat for Humanity. He had asked if people could donate things like old scrubs or whatever and when I saw it was for Habitat for Humanity I thought I'd jump in and help (having been a habitat for humanity supporter in the past).

Now I'll say it first. I am bastard for getting things done at the last minute. But this guy should arrive on friday, the first day of the haunt. Please don't f**k it up UPS! This guy is going to get bolted to a headless mannequin body. Man it's hard to try and think about how things should fit together on something you can't see and touch, but I added some extra neck so Shane can saw him to fit. I hope that works out.

This is hands down the goriest prop I have made. It was fun to make even if it's a bit too much for my haunt. I like gross, and I think I have proven that in the past, but I also like the magic of undead creatures, if that makes any sense. The gore of this prop just speaks to the reality of mankind. We can be very savage to each other and theres no magic in that, but that's also the terror of it, it's realness.

Jokers Head_1

Here is the finished product. Gruesome eh?

jokers head side views

Here are some shots from the side.

I wanted this to look like the inmates in The Asylum had gotten to one of the doctors (of whoever it will be, maybe the warden?) and had tortured him. Broken and pulled out teeth, the nose cut off, and the tongue cut out, and the face cut off. I didn't want it to look too surgical, so I made a bunch of cuts, to try and make the surgery seems cruel and frantic.

jokers head tounge and nose detail

Here are a couple little bits I made to pose with the prop. This just shows the fronts and backs of each piece. I ran out of time but I had wanted to include the torn off face.

jokers head mouth detail

Here is a shot of the detail in the mouth. I used my airbrush here to try and give it a tissue like feel. I would have liked to go nuts on the detail, but I was running against the clock and had to ship this guy.

I have a few pictures of his construction but I haven't really made a how-to for this guy, just because he was made so quickly. I'll be doing a how-to on muscle and these broken teeth, so stay tuned for that.

Materials list:

Muscles: magic sculpt epoxy clay

Eyes: Hong Kong eyes from e-bay

Teeth: Sculpey brand translucent

Ears, Tongue, and nose: Super Sculpey III

Skull: Foam copy of customized Lindberg skull

Skin: Creative paper clay

Neck tissue and substructure: Smooth-on Plasti-Paste


Joker's head

Joker's head

First I sculpted half the face in Magic sculpt and referenced pictures of anatomy on the internet.In the most basic sense, I copied the muscle shapes onto the skull and then drew lines into it with a needle like tool. Nothing fancy there.

Joker's head night 2

I then mirror the first side I did onto the other side. Looks almost happy, but we'll fix that soon enough.

Joker's head night 3

Joker's head night 3

JOKER'S HEAD NIGHT 4

Then I put on the Creative paperclay. I used paperclay because it lets me crate much more subtle textures than the epoxy clay. I used a slightly damp hog bristle brush to gently push in some skin texture. I then used a rough wire brush tool to mess up the edges of the skin, and an exacto knife to cut away chunks and make gashes.

I theem to haff loth my tung

I used duct tape and great stuff to fill in the jaw. On top of that I used some more magic sculpt to make the soft palette and the tongue stump.

Bulking up the neck

Here I am bulking out the neck with plastic grocery bags and duct tape, and then covered in layers of foil to give it a grippy surface. The neck support is a piece of 1/2 inch PVC pipe.

Plasti-paste coated onto neck bulk

In this shot the is still uncured, but I have used Smooth-On's Plasti-Paste to create a hard plastic shell on which to build the paperclay that will go on the neck.The texture was good enough to use as ripped up flesh so if you look at the finish product, I have just painted it read, and there are only two tendons sculpted over that.

neck work

neck work

neck work

Here is a shot of the paperclay build up. You can see the yellow of the Plasti-Paste showing thru.

Jokers Head Night 6

Here I started roughing in the color. I am going to recommend this color over and over so get used to it. Liquitex liquid acrylics "acra scarlet orange". I know orange you say, but this looks like fresh "cut my hand open again" blood.

Jokers Head Night 6

The bone is Liquitex "parchment" which looks great and by awesome coincidence, when mixed with the acra scarlet orange makes a perfect skintone which I used on the neck and ears.

Jokers Head Night 7

To bring out the detail in the muscle I used Alizrian Crimson Hue and Phatlo Green mixed together to give a darker dried blood look to shade the lines in the muscles. I used this as a thin wash and traced the edge of each muscle and then brushed it over the ends of each muscle and let it flow into the grooves. I also used this color as part of the bruising colors on the skin.

jokers head side views

The hair I cut off a cheap halloween wig and applied using latex mixed with acrylics to match the skintone. I applied it in rows, starting from the bottom and working up, with each new row covering the last rows ugly edges. At the top of the head I airbrushed some transparent back to blend in the edge, and dry brush some black paint to hide the edge of the hair. I used cleat satin varnish as hair spray on the hair, which helped to keep it uniform, and kinda glued the loose pieces together.

The teeth come out slightly yellow after you bake the translucent sculpey. The more you bake it the yellower,browner, and darker they will get. I washed these with a light wash of raw umber, a yellowish brown, then mixed in some red with the wash and touched up the areas where teeth are broken.

I used Krylon Crystal Clear Gloss to seal the face and inside the mouth to give it that wet look, and then used satin on the skin followed by a dusting of matte.