Say Hello to Carver Creep. An iteration of last year 's alliterated hero, Cauldron Creep. Yep, these guys work together. Hey, they are even related! Carver stacks em up, and the Cauldron boils em down.
Carver Creep is a an exercise in set building more than anything. He is essentially a Bucky skeleton with a GYS 3 axis Lindberg Skull kit. The mount I made so that the can be hunched over but not talk straight down into the table is the only trick thing going on here.
The Carver Creep set consist of a victim skull whose face has been removed and his tongue cut out and cut up like sashimi, a bowl full of shrunken heads, a stack of skulls under his table, an altar, and a drying rack for skinned faces. He also has a set of custom cutlery made from burning wood, flesh, and steel.
Now I'm not a technical guy in anyway, I can learn the stuff but I usually break it or ruin the first one of whatever my first attempt. At $200 bucks a kit, I decided to get some help. Through old fashioned bartering I entered into a trade with the tack smart and all around good guy Mr. Chicken. I made him a full on zombie to fit a sketch he had for a prop he wanted to build this year, and he assembled and programmed the skull to a soundtrack I made and a confusing tape of me trying to show him how the head should turn and look around as he talks. When I got the head back I installed the LED eyes and monsterguts.com eyeball blanks, closed up the head and filled the seam, except a screw driver sized hole in the back, so I can always pop him open if I need to.
I painted the whole thing with White Primer, then washed it down with Raw Umber and Matte Medium. Over that I used Wildfire White UV paint, which glows insanely bright, and is transparent under white light. I made some teeth from Fimo Translucent clay (the FIMO brand glows under black light).

(look! its seamless, mmm so nice!)
The Victim Skull
I made this guy from one of the casts I made from my new mold I made from a modified Lindberg skull ( I drilled out the tooth pegs to look like real tooth sockets and added texture to the skull's forehead). The eyes are the Hong Kong eyes I got on Ebay with some Magic Sculpt Epoxy Clay for the muscles. The skin is Creative paperclay, since I find that easy to texture subtly. I made the ears out of Sculpey Firm. His teeth are the Sculpey Translucent, which is not UV reactive. His tongue and skinned face are also Sculpey.

Tools of the Trade
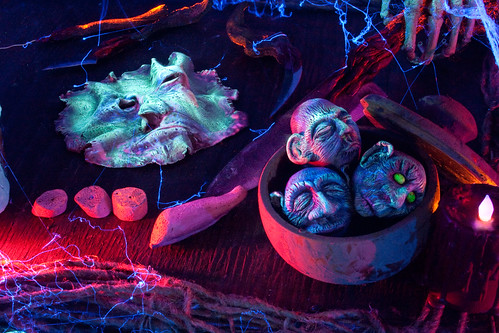
I need to shoot these under a black light so you can see the burning ember effect, but this shot shows the metal nicely. These are tree roots I got at Castaic Lake. They are kinda like driftwood, but way more textured. I made the blades from sheet styrene which is the same plastic used on model kits (you can get it at a good hobby shop). I attached them with some plumber's epoxy then covered that with detailed muscle like tissues made from Magic Sculpt. The bone needle is all Magic Sculpt.

Tiny Heads
I made these guys as an experiment with different combinations of Super Sculpy 3, Fimo, and Super Sculpey Firm. I tried to make different characters with each one. These are painted with eh Craft Smart brand of paints from Michael's.

Skull Pile
These are some full and half skulls casting I made form the same mold of the modified Lindberg skull. I made Fimo teeth and painted them with Wildfire white. These are cast in SmoothOn's Foam-It 5 which makes a very durable foam skull that can be handled roughly and dropped with little or no damage.

The Altar
The altar is built around a giant root I brought back from the lake. I covered it with resin fetal skulls I made from a mold in this how-to. I surrounded the Altar with candle made from PVC, Hot glue, and flicker candles from the how-to in the Mitchell's How to Haunt your House Book. (Thanks to everyone in the crew who pitched in and helped make these candle. I think everyone did at least one). I then put in some of th e cool things i have collected over the years. A monkey skull, some hark jaws, a few jawbones, a Samoan tiki, and old metal dish filled with amber stones, and some shrunken heads from the previous years, which as I look at the pictures didn't have any black light paint on them.

The Drying Rack
I made this as kinda of a death mobile. A drying rack for skins and herbs. The two faces are Sculpey I laid over a cardboard skull masks from Michael's. The backs are covered in GreatStuff and painted like dried blood. I hung little bundles of plants that looked like herbs from the bottom rack. I had wanted to make ears for this to on the middle rack, but I just ran out of time. I'll finish it though, just for finishings sake.

The Routine
Here is the routine. For some reason my voice is coming thru the mix more on Youtube, but you'll get the gist. The camera is off axis from the dead zero of the skull, but its the only video that came out in focus on my new camera (need to read that manual.
